Homelab Upgrade – VCF 9.0.2 to VCF 9.1.0

I’ve been busy in the first four months of the year. My homelab got its much needed new hardware to enable me to update VCF from 5.2 to 9 (more on that another time perhaps). With the release of VCF 9.1 this week though, it’s time for my first big update.
This post will document my journey through the process including any hitches that I encountered along the way. I used the VCF 9.1 documentation to guide the order for applied updates.
Note: I missed a step here! My Identity Broker instance, although it was on a dvPortGroup, wasn’t on the same network as the VCFMS cluster it was going to land on. I should have moved it first.
VCF Operations
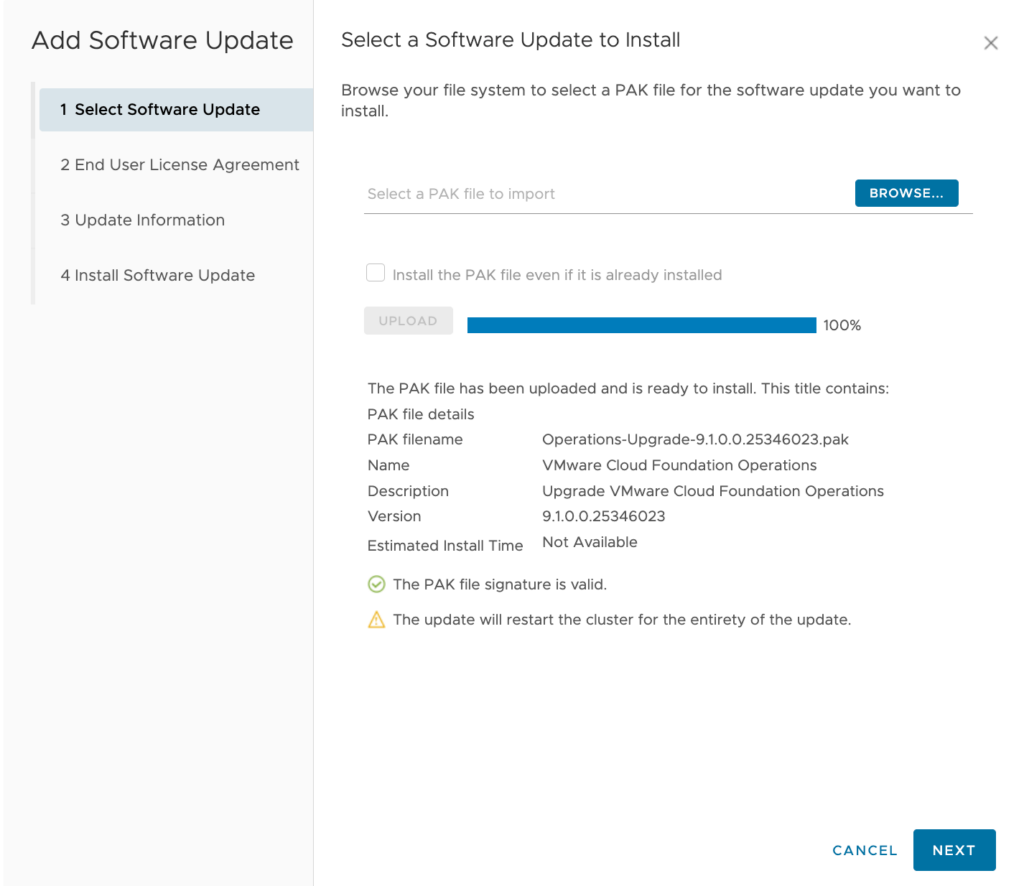
The first step in the journey for me was updating VCF Operations to 9.1. This was accomplished by downloading a .pak file from the Broadcom Support Portal and uploading it to my VCF Operations instance’s admin page.
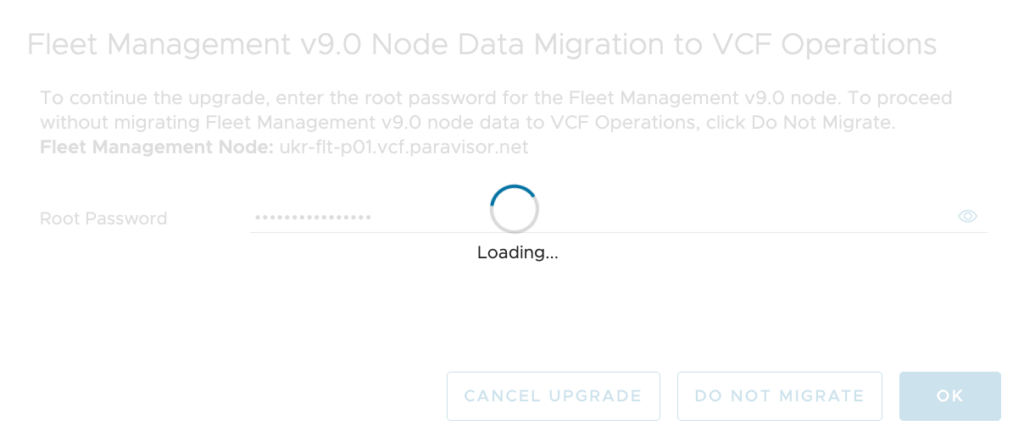
After starting the update the UI will go offline for a short period. You need to reconnect again to answer a prompt for the Fleet Manager appliance’s root password. (I clicked “OK” before I remembered to take a screenshot!)
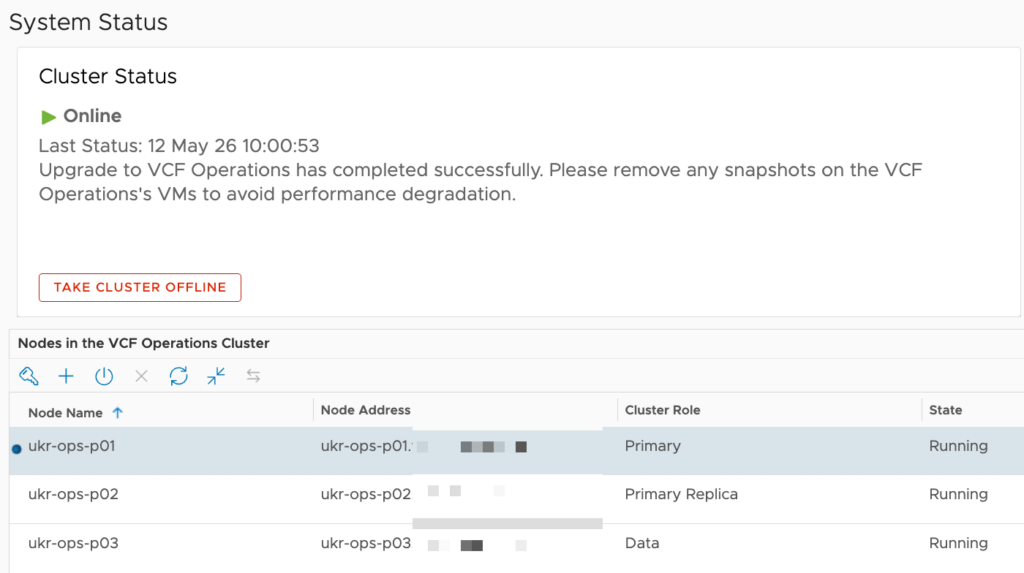
The complete update duration will vary depending on the size of your cluster, hardware performance etc. Eventually though you’ll see the system status get back to normal.
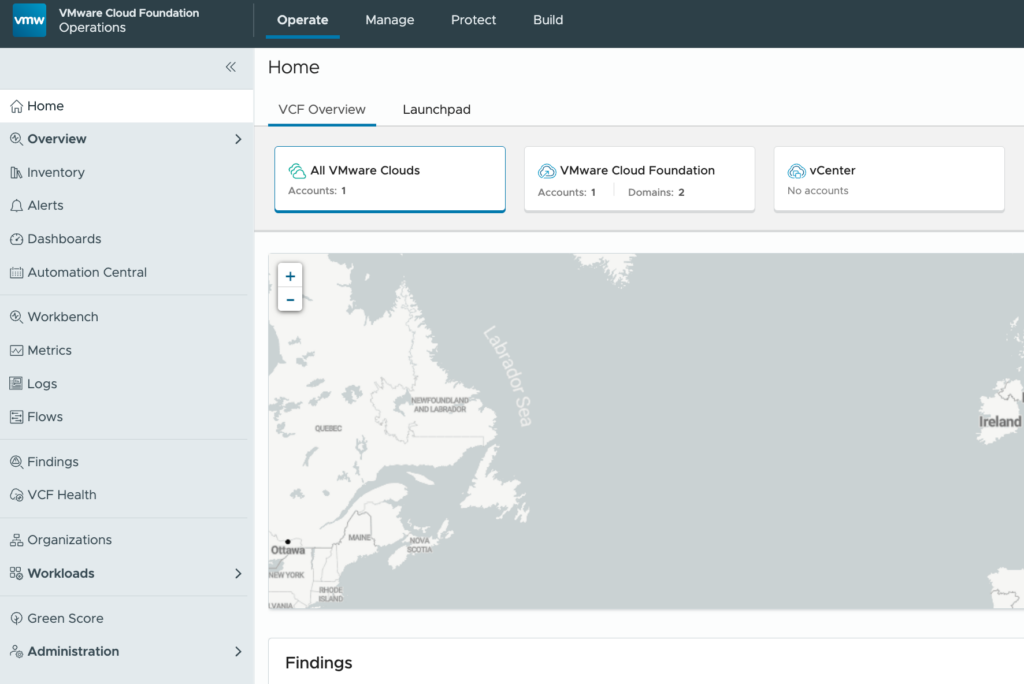
Back in the VCF Operations UI, you’ll see some visual / layout differences compared to version 9.0.2.
Also, the update process shuts down the Fleet Manager appliance. This is because the functionality has now been integrated into VCF Operations. You can eventually delete the Fleet Manager.
That’s 4 vCPUs and 12GB of RAM back! You’ll need it later!
SDDC Manager
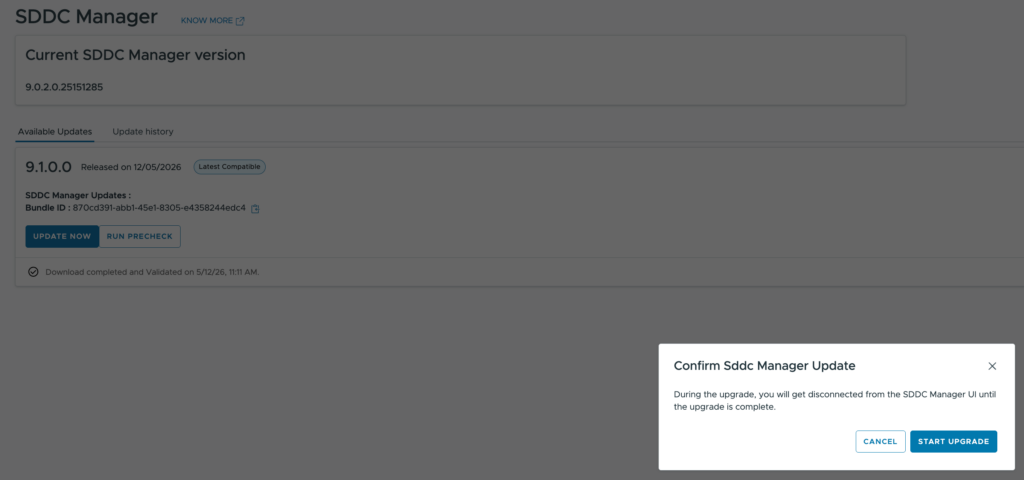
SDDC Manager is the next component to be updated. After it had synchronised with the Broadcom downloads site the 9.1.0 update was there and easily downloaded. A nice big button labelled “UPGRADE NOW” invites you to apply the update.
However, this is where I hit my first hurdle. After seeming to start the update process, the task would suddenly change status to “Cancelled”.
Through the UI the task didn’t have any helpful information to diagnose the issue so I had to turn to an SSH connection. A quick search of the /var/log/vmware/vcf/lcm/lcm-debug.log file for the term “CANCELLED” yielded a hit at about the correct time:
2026-05-12T12:39:12.202+0000 INFO [vcf_lcm,6a031f70382279124ce7938475524d41,75f4] [c.v.e.s.l.d.c.u.UpgradeClientImpl,Scheduled-6] Upgrade status is SCHEDULED, changing it to CANCELLED.I repeated the search but using the Id (6a031f70382279124ce7938475524d41) from above to see related messages. The key one was this:
2026-05-12T12:39:12.179+0000 INFO [vcf_lcm,6a031f70382279124ce7938475524d41,75f4] [c.v.e.s.l.a.i.i.LogicalInventoryClient,Scheduled-6] acquired the resource lock for the resource : { "status": "FAILED", "createdTimeStamp": 0, "errorMessage": "Deployment level lock cannot be acquired. There are existing resource locks.", "resourceType": "DEPLOYMENT" }I’ve had issues with resource locks before. Whilst you should consult Broadcom support if you encounter such an issue, since it’s a homelab I proceeded to check on the resource locks myself. To do this you need to switch to using the root account using su -.
If you want to see what locks exist, the command is:psql -h localhost -U postgres -d platform -c "select * from lock;"
I had four locks there that should not have been present as I wasn’t making any changes. I cleared them using a “delete” query and then tried restarting the SDDC Manager update.
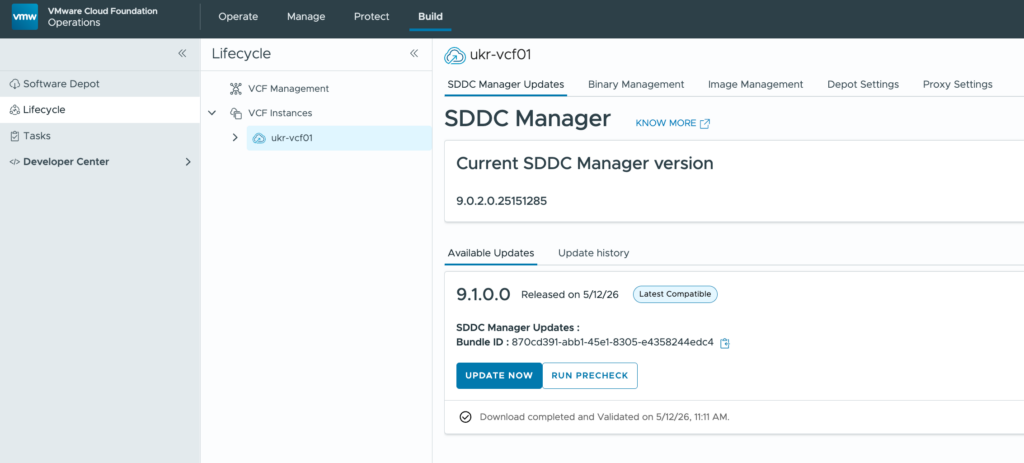
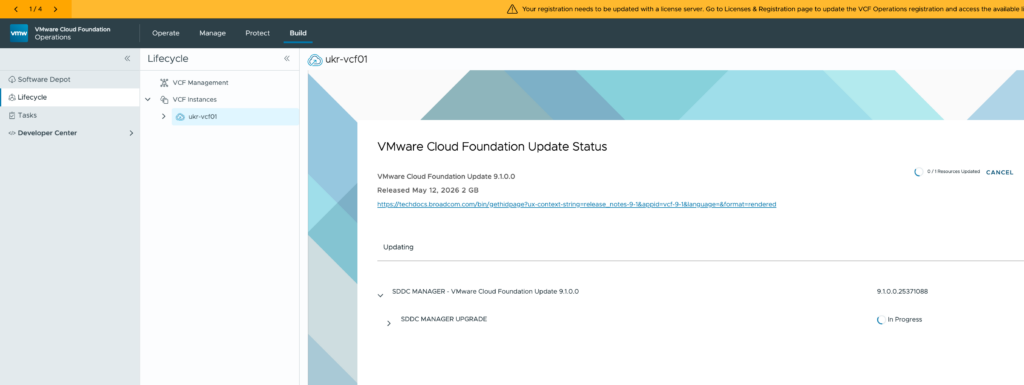
This time the update went through. Eventually, after refreshing the UI, you end up with something like this:
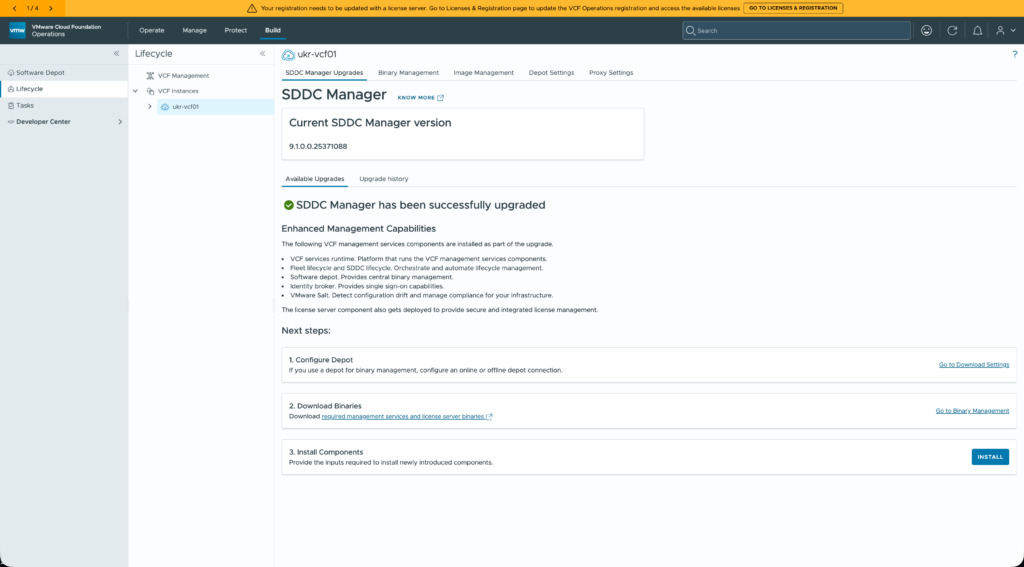
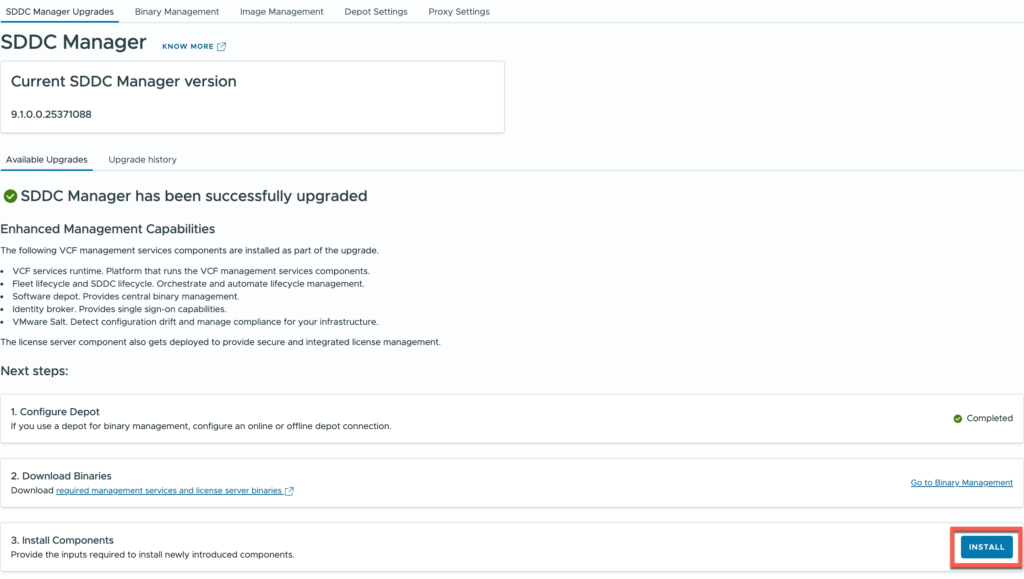
Before the SDDC Manager update can be considered complete, you need to complete the first two of the “Next Steps” identified by the UI.
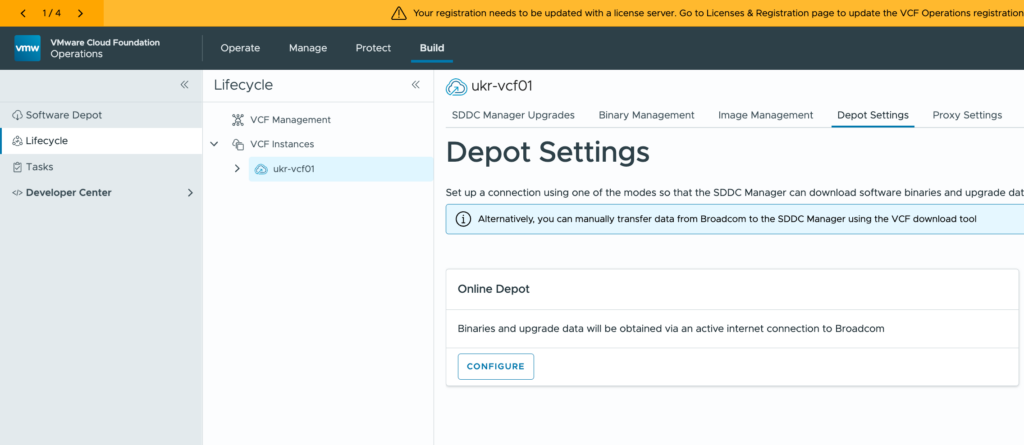
Configuring the Software Depot replaces the download token-based mechanism from earlier VCF versions and is needed to download binaries for the remaining components. Because it’s my lab I opted for an online (connected) depot configuration. The links in UI send you round the houses a bit in my opinion, but the depot option is on the fourth tab shown in the screenshot above.
After clicking the “Configure” button, you’re shown a unique SDDC Manager Id that you need to copy.
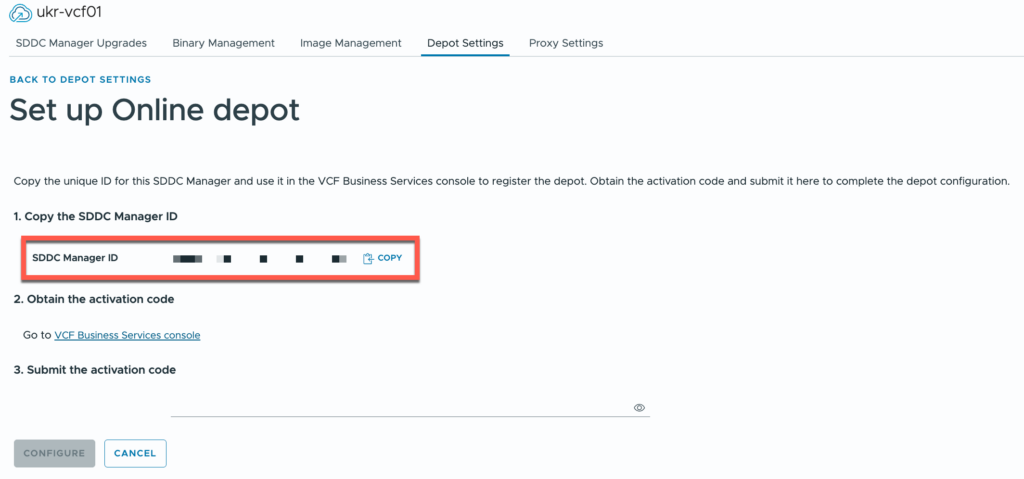
It needs to be added to the VCF Business Services console where you are provided with an activation code in return. That code gets pasted into the VCF Operations UI.
Downloading binaries is a doddle at that point. At a minimum you’ll want to download vCenter, NSX and ESX upgrade binaries along with install binaries for everything else. Go and make yourself a cup of tea…
VCF Management Services
This bad boy is new! It’s very much like the Identity Broker deployment in VCF 9.0.x but it includes more services, including Identity Broker itself.
Let’s not get ahead of ourselves just yet. First we have to deploy the VCFMS platform before we worry about Identity Broker.
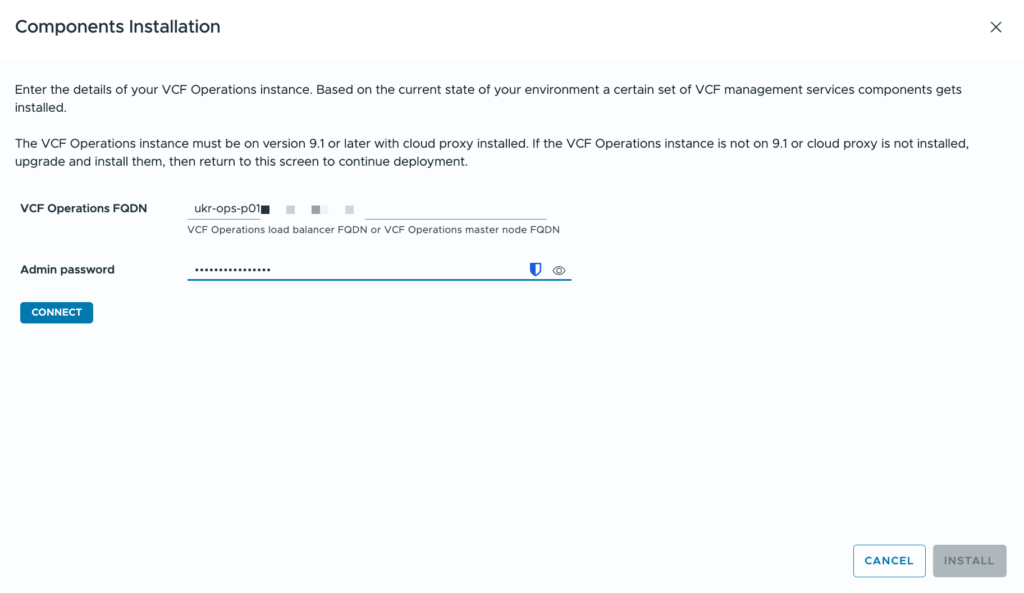
Back in VCF Operations (because everything is), we’re going to hit that fancy “Install” button.
We’re prompted for the FQDN and admin password for VCF Operations. If the connection is successful then the next “Install” button is enabled and we can continue.
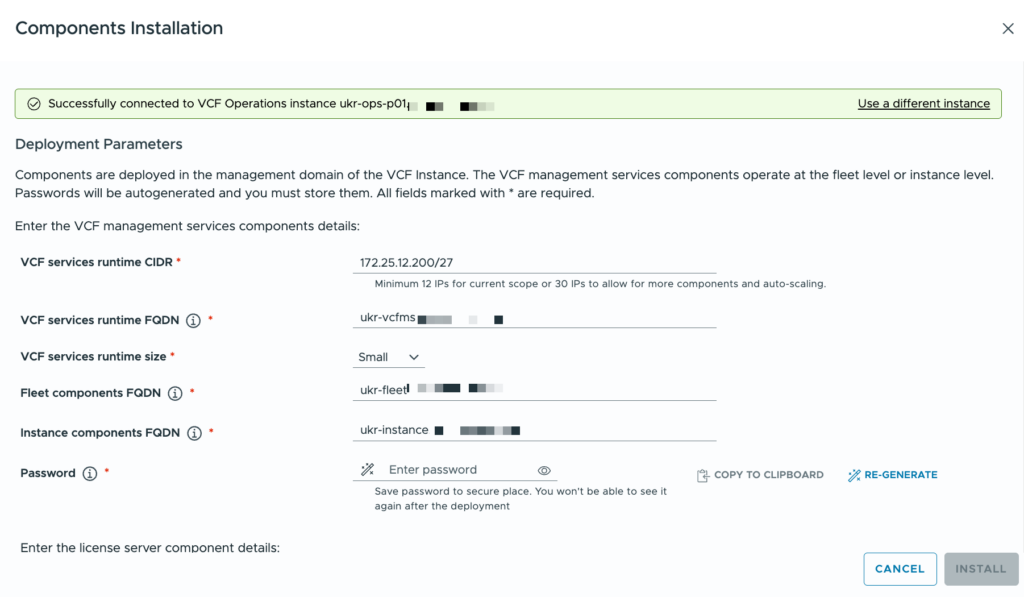
This is where we need to supply some configuration information for the VCFMS deployment.
| Configuration | Value (Example) | Description |
|---|---|---|
| VCF services runtime CIDR | 172.25.12.96/27 | A range of available IP addresses in the management network for the VCF instance. This is the same network that the management vCenter server and NSX Manager cluster are in. This range of addresses (30 is recommended) must not include any of the FQDNs below. |
| VCF services runtime FQDN | vcfms.domain.com | The FQDN for the VCFMS runtime platform. This must resolve to an IP address in your management subnet. |
| VCF services runtime size | Small | Governs the size of the VCFMS deployment. The default is small. Small includes a single control plane node and three workers. |
| Fleet components FQDN | fleet.domain.com | The FQDN that the fleet components will use. These include: Fleet Lifecycle, Salt RaaS, software depot. This must resolve to an IP address in your management subnet. |
| Instance components FQDN | instance.domain.com | The FQDN that the instance components will use. These include: SDDC lifecycle, Salt master, real-time metrics, real-time metrics store, and telemetry. This must resolve to an IP address in your management subnet. |
| Password | VMware123! | The default administrative password for the VCFMS cluster. |
| License server FQDN | license.domain.com | The FQDN that the License Server will use. This must resolve to an IP address in your management subnet. |
Because I’m upgrading VCF and I already have Identity Broker deployed as a cluster of appliances, the option to specify an FQDN for Identity Broker is not shown to me.
Assuming that everything is validated you’ll be able to click the magic “Install” button again and then watch the progression in the associated task / subtasks and in your management vCenter.
Like the deployments for Identity Broker and VCF Automation in VCF 9.0.x, the process followed is that a template is created for VCFMS nodes. Here you can see the one in my lab:
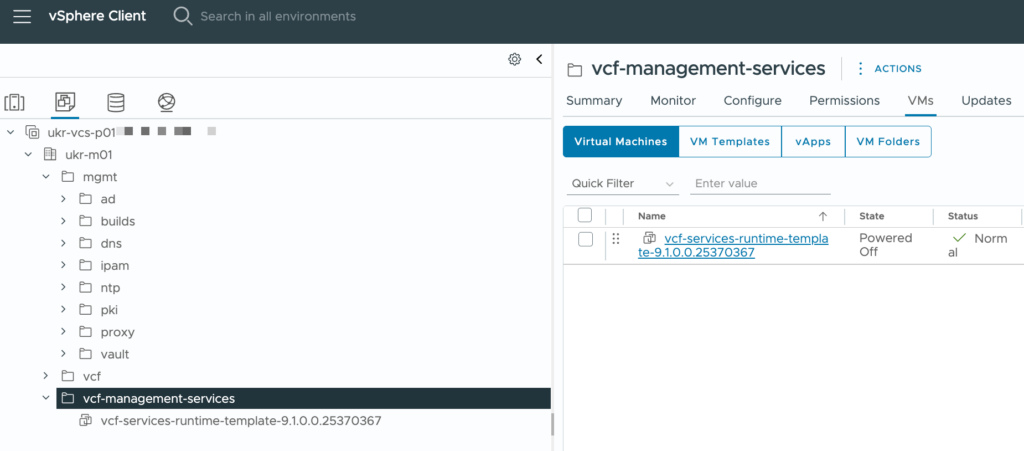
The template is cloned to produce the nodes that make up the VCFMS cluster. The whole process takes some time. It was about 4 hours in my lab, your experience may vary.
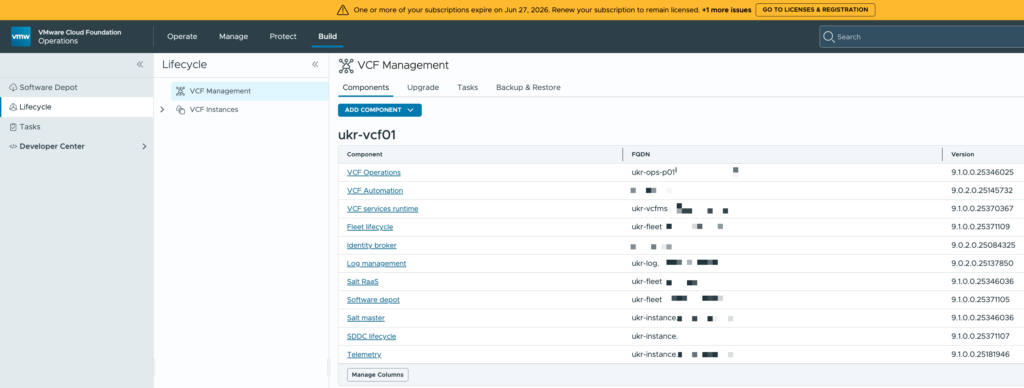
In VCF Operations you can now see the components and versions that are deployed.
VCF Automation
Next on the list was VCF Automation. The upgrade process from 9.0.2 to 9.1.0 involves the deployment of a new cluster and the retirement of the previous one. Before that can happen though, some configuration of the new cluster is required.
Under the Update tab for Lifecycle in VCF Operations you are shown the components that are not currently part of the the VCFMS cluster: VCF Automation, Identity Broker, and VCF Operations for Logs.
VCF Automation is “Pending Configuration”…

The configuration dialog is pretty simple:
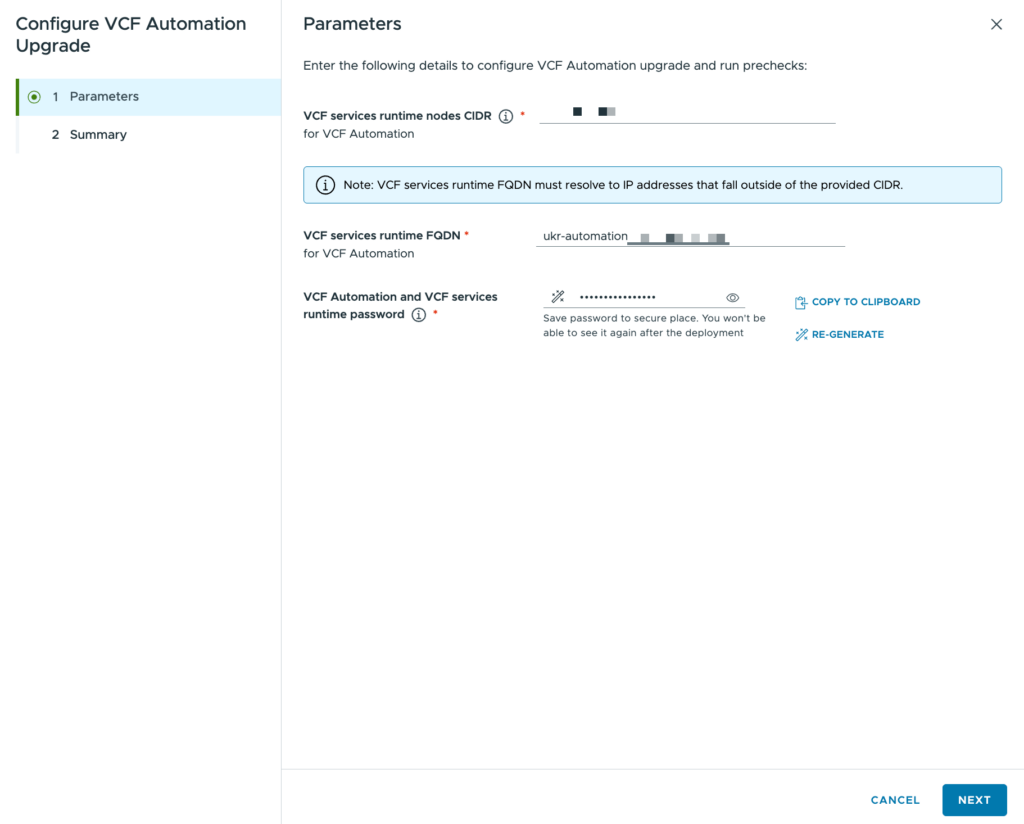
Just three pieces of information required that I have summarised in the table below:
| Configuration | Value (Example) | Description |
|---|---|---|
| VCF services runtime nodes CIDR | 172.25.12.40/29 | A range of available IP addresses. A /29 is required. This range of addresses must not include the FQDN below. |
| VCF services runtime FQDN | automation.domain.com | The FQDN for the VCF Automation component. This must resolve to an IP address in the same network as the CIDR above, but not be part of that CIDR. |
| Password | VMware123! | The default administrative password for VCF Automation. |
The configuration information is processed briefly before you are returned to the Update tab again.
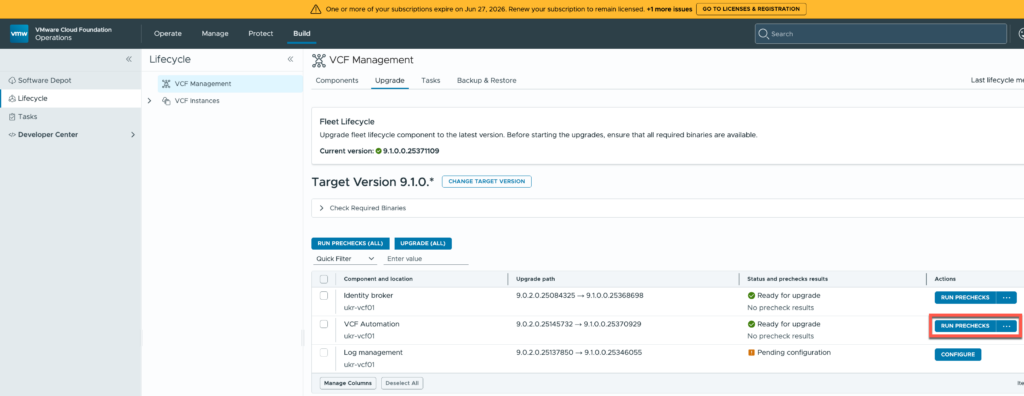
The three dots button can be used to trigger the update immediately, but the recommended approach is to “RUN PRECHECKS”. It takes a few minutes to execute but everything came back ok.
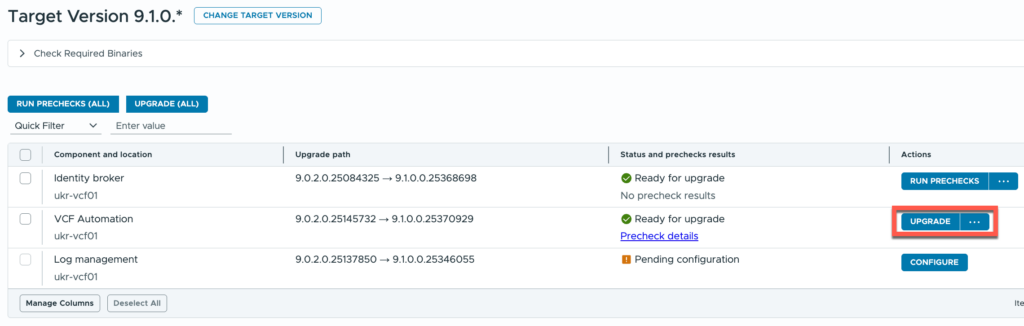
I just hit the “UPGRADE” button and waited…
The upgrade failed initially. It turns out that I accidentally re-used an IP address. As I didn’t have much configuration in it, I found a way to remove it as a component in scope of the upgrade. Instead I went for a new day-N deployment.
VCF Operations for Logs
From a UI standpoint Logs is pretty similar to Automation. Behind the scenes though there are some differences. VCF Operations for Logs moves into the VCFMS cluster, leaving behind the original appliances. Migrating log data becomes an activity that must be completed later on.
Like with VCF Automation, some configuration must be supplied.
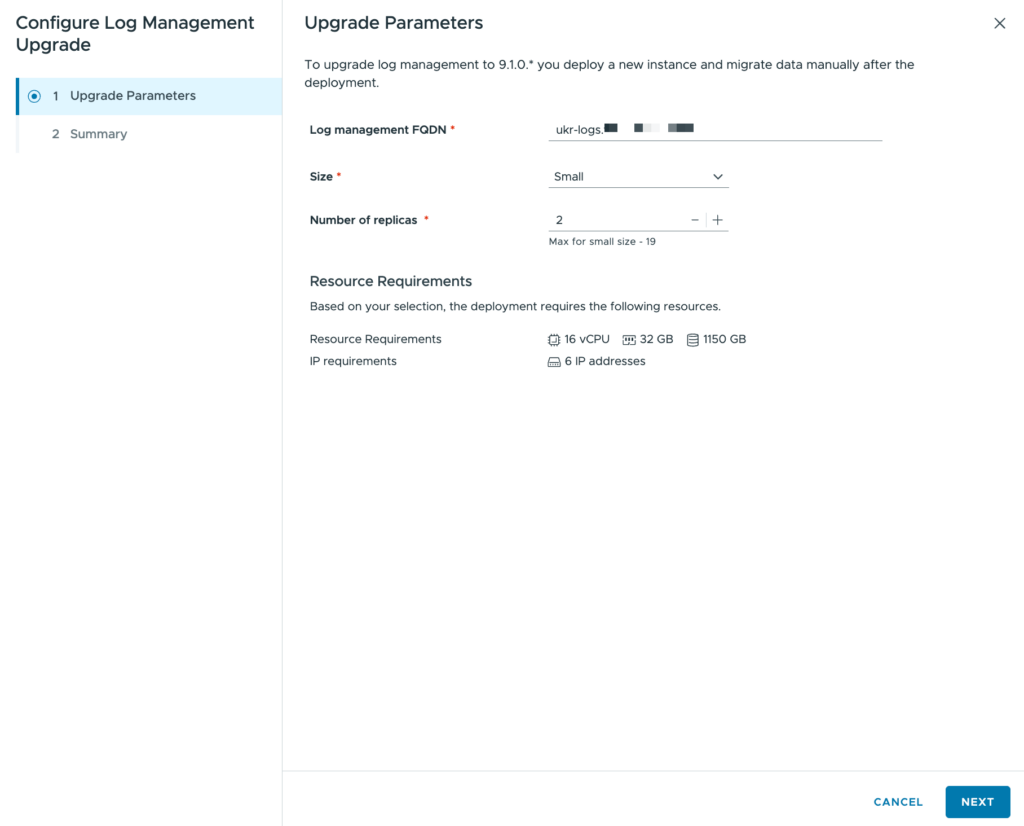
I have summarised them in the table below:
| Configuration | Value (Example) | Description |
|---|---|---|
| Log management FQDN | logs.domain.com | The FQDN for the VCF Automation component. This must resolve to an IP address in the same network as the VCFMS runtime CIDR, but not be part of that CIDR. |
| Size | Small | The size of the replica(s) that will be configured. Small is the default. |
| Number of replicas | 1 | The number of replicas that will be configured. Each replica increases the resource requirements. |
The configuration information is processed briefly before you are returned to the Update tab again. This time there wasn’t an option to run any pre-checks so I just proceeded with the “UPGRADE” button.
When the upgrade finishes, VCF Operations for Logs is removed from the list of upgrades and shows in the list of components with the newly updated version.
Should you wish to transfer historical log data, see the Log Data Transfer documentation.
Identity Broker
This is where the upgrade came a little unstuck. I thought that the first step in the process didn’t apply in my case, but it turns out that it did.
I mis-read the qualifying criteria for the very first step in the upgrade guide – Transition a VCF Identity Broker 9.0.x Instance to the VCF Management Network. My Identity Broker cluster wasn’t on a VxLAN overlay so I moved on to VCF Operations. But, dear reader, my Identity Broker cluster wasn’t on the VCF Management Network, it was on another dvPortGroup. So before doing anything I should have moved it.
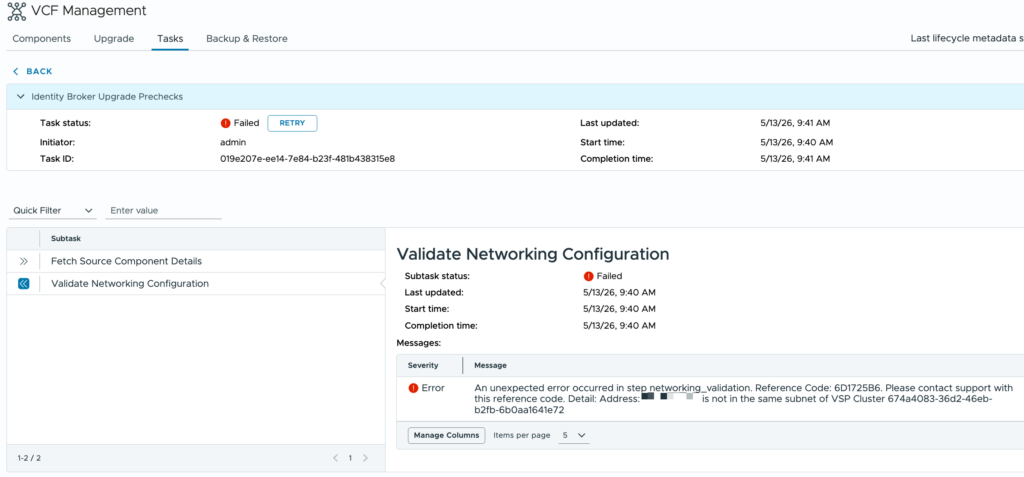
As the pre-check result above shows, Identity Broker wasn’t running on the network that the process expected it to be on.
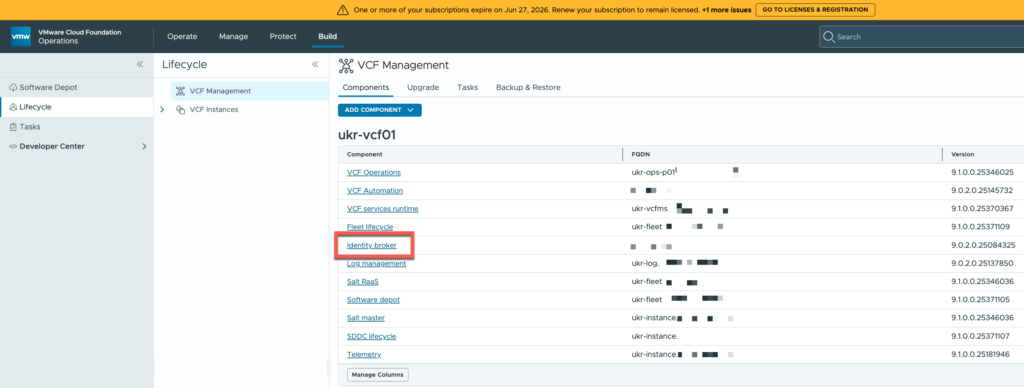
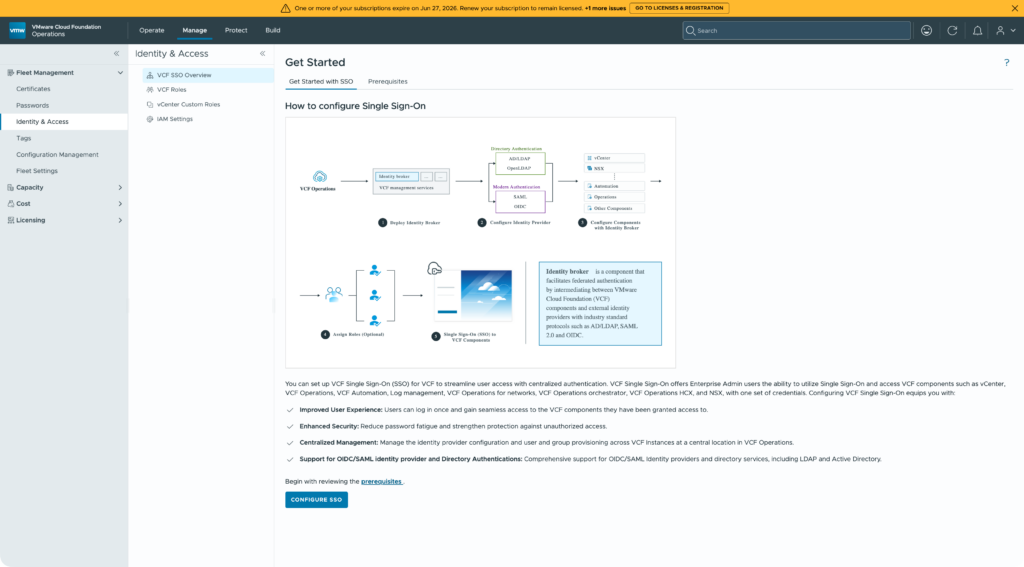
The instructions in the upgrade guide assume that the Fleet Manager is still running and VCF Operations hasn’t been updated to 9.1.0 yet. Neither of which were still true! Returning to the Components tab, the Identity Broker deployment is hyperlinked.
Clicking that link gives you a bit more detail about the component.
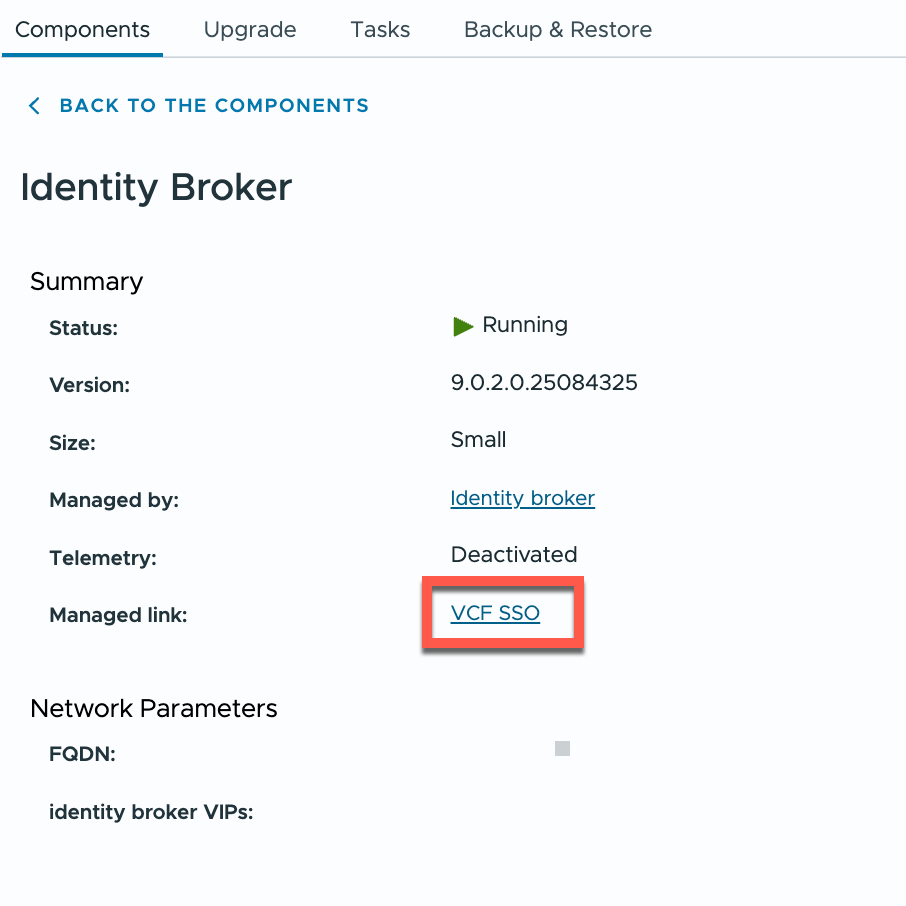
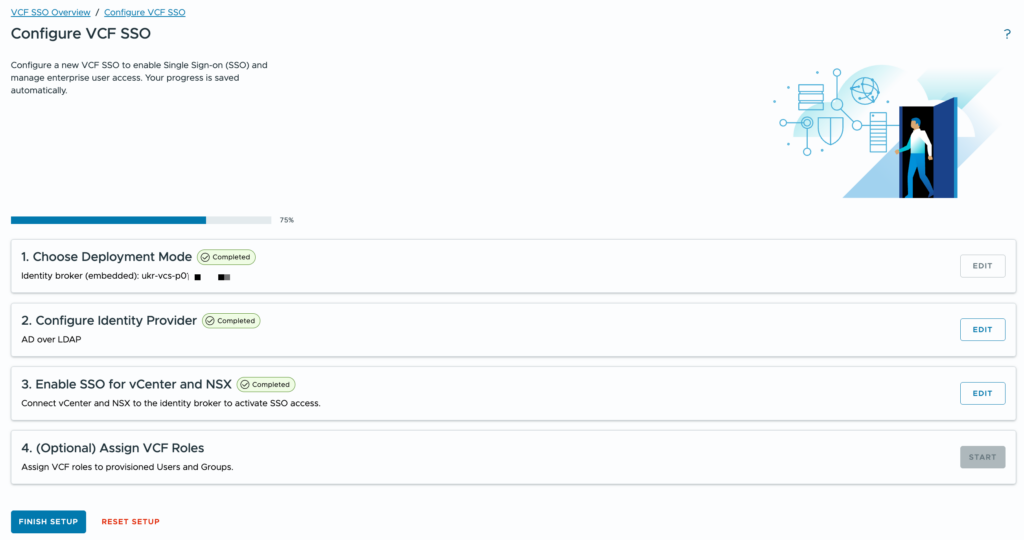
From there the “VCF SSO” link takes you a “VCF SSO Overview” page.
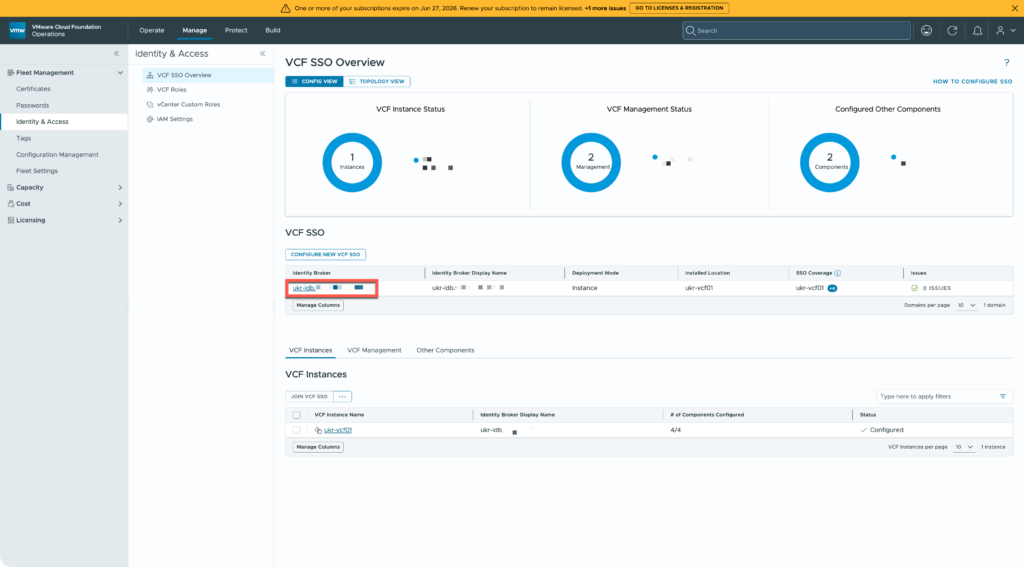
I used the highlighted link to go to my SSO configuration.

From there it was possible to delete my SSO configuration. Yes, I’m sure!
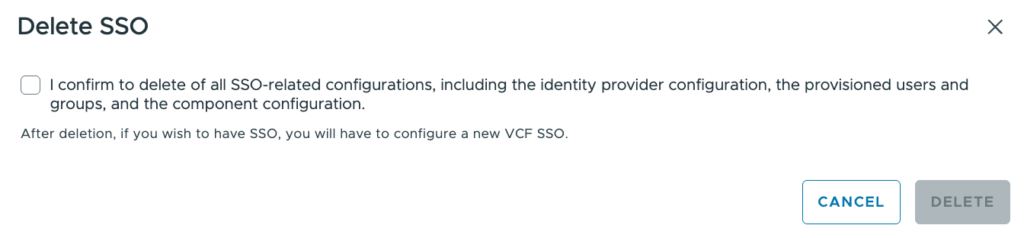
A short time later, I could configure a new SSO.
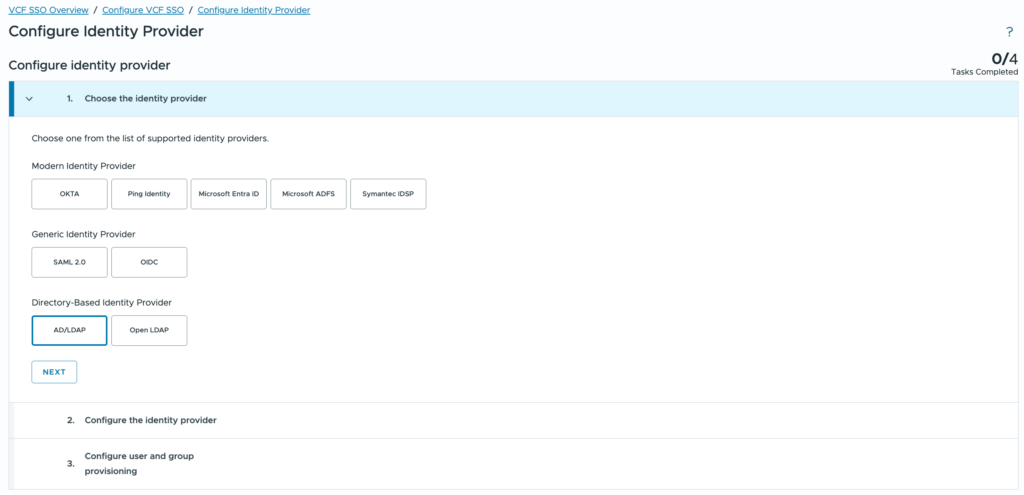
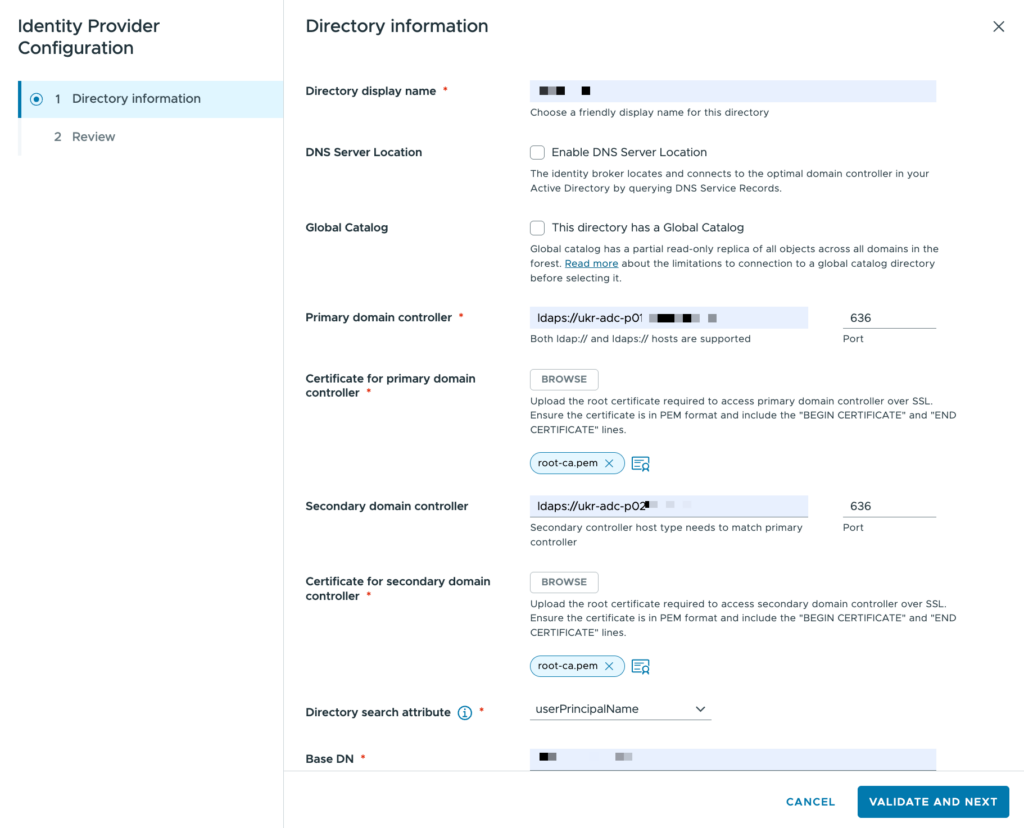
Deleting the SSO configuration above didn’t remove the Identity Broker cluster itself, just the SSO configuration. As a result I had to recreate it using embedded mode.
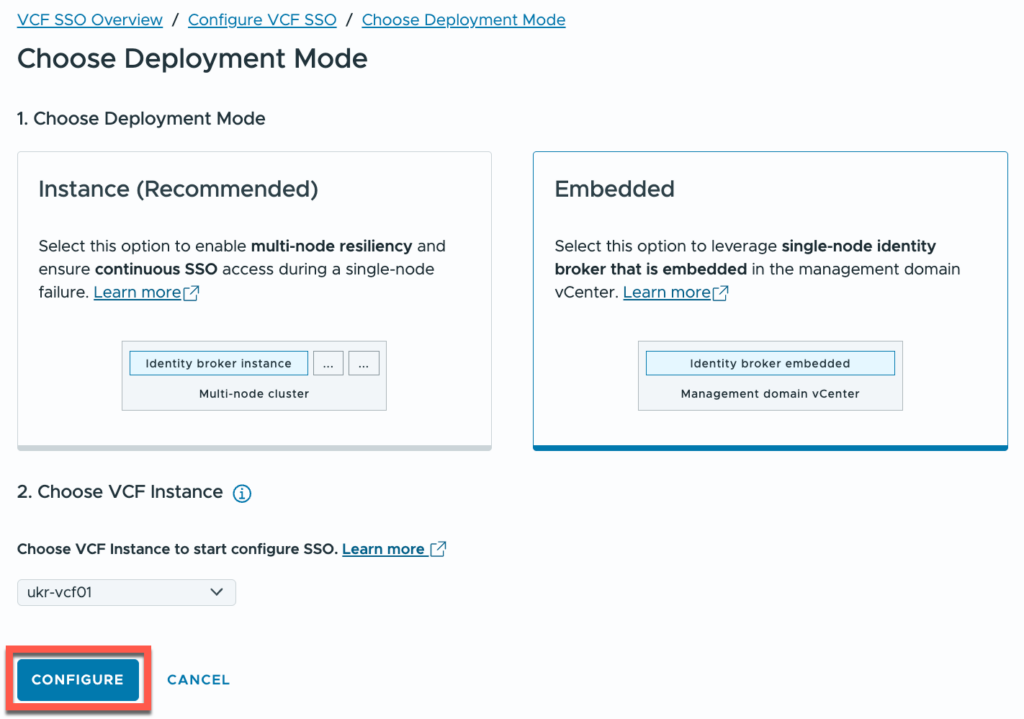
The screenshots below show a couple of the steps involved.
Although SSO has been moved now, there are a couple of tasks that I need to circle back and fix:
- Identity Broker functionality needs to be moved from the management vCenter to the VCFMS cluster (see Migration of Identity Broker Embedded to Identity Broker Instance). This task is reliant on completing task 3 and completing the vCenter upgrade.
- Components will need to have groups and roles reconfigured. Not a big problem.
- The upgrade for the old appliance cluster is still sitting there. I need to work out how to remove it. This was more of a challenge. There is a way, but it’s not something that I should share publicly. If you do hit a situation like this, contact Broadcom support.
Some time later I had tasks 2 & 3 sorted and I was back on track.
VCF Core Components
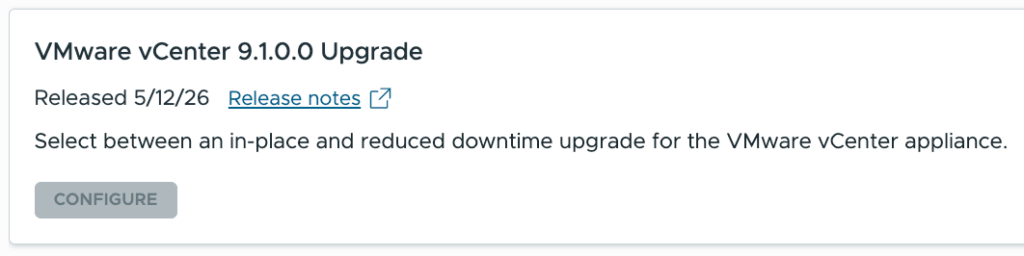
This step is to update NSX, vCenter, and ESX in the management domain. These upgrade processes are more mature than for some of the other components and so I hadn’t planned to cover them in detail. However I hit an issue after upgrading the NSX Managers.
Broadly, the order of upgrades here is:
- NSX Managers
- vCenter Server
- ESX hosts
- NSX Edge Clusters & NSX Finalize
Once the NSX Manager is done, you’d expect to be able to roll into the vCenter update. The “CONFIGURE” button wasn’t getting enabled for me though.
I tried restarting numerous components without any change in the state of the upgrade. I even tried cancelling the upgrade but that failed with a message about a draft upgrade. That eventually led me to the solution after some time.
VCF Operations essentially surfaces some of the SDDC Manager functionality to centralise the VCF upgrade process. By comparing what I was getting in VCF Operations with what I was seeing in the SDDC Manager UI, I was sure that the issue was with SDDC Manager. I spent some time looking at the lcm-debug.log file for clues and I even looked through database tables to see if I could work out what was going on.
The message about a draft update eventually led me to look at the SDDC Manager API and inspect the “Upgrades” category. It’s perfectly safe to execute any of the GET requests as they’re only reading information!
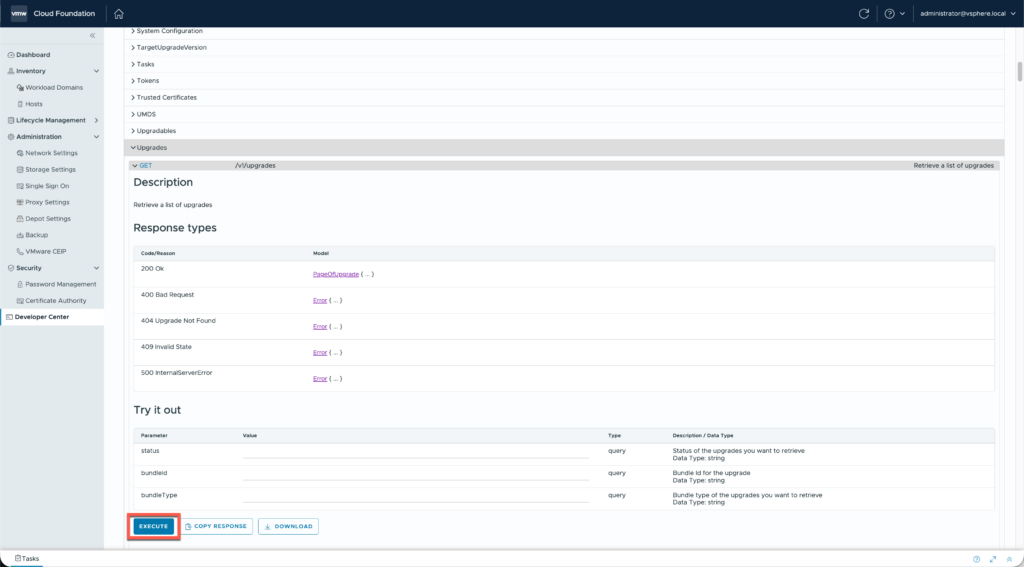
Running the GET request for /v1/upgrades returns a number of results that I briefly looked through. Most completed, but the final one had a status of “DRAFT”… and it related to the NSX Manager upgrade! The previous one was for a successful NSX Manager update to 9.1.0. So although the NSX update went through and was ticked off SDDC Manager still had a draft plan to update NSX registered.
I have no idea how that happened, I can only speculate at this point. Below is the result that I saw:
{
    "id": "3d50daeb-d254-49fa-b950-3585fc4a5387",
    "bundleId": "d6a5d16d-63f9-5eed-a81e-cab26b6d95f1",
    "resourceType": "DOMAIN",
    "parallelUpgrade": false,
    "resourceUpgradeSpecs": [
        {
            "resourceId": "5f2332eb-d404-42ba-a95b-a96b16b66315"
        }
    ],
    "status": "DRAFT",
    "taskId": "3d50daeb-d254-49fa-b950-3585fc4a5387",
    "nsxtUpgradeUserInputSpec": {
        "nsxtHostClusterUpgradeSpecs": [],
        "nsxtEdgeClusterUpgradeSpecs": [],
        "nsxtUpgradeOptions": {
            "isEdgeOnlyUpgrade": false,
            "isMpUpgrade": true,
            "isDatapathApplianceUpgrade": false,
            "isHostClustersUpgradeParallel": false,
            "isEdgeClustersUpgradeParallel": false
        },
        "nsxtId": "ukr-nsx-p01"
    },
    "bundle": {
        "id": "d6a5d16d-63f9-5eed-a81e-cab26b6d95f1",
        "type": "VMWARE_SOFTWARE",
        "description": "https://techdocs.broadcom.com/bin/gethidpage?ux-context-string=release_notes-9-1&appid=vcf-9-1&language=&format=rendered",
        "version": "9.1.0-25318225",
        "vendor": "VMware",
        "releasedDate": "2026-05-12T04:04:55Z",
        "isCumulative": false,
        "sizeMB": 6514.90234375,
        "downloadStatus": "SUCCESSFUL",
        "components": [
            {
                "description": "NSX_T_MANAGER",
                "vendor": "VMware",
                "releasedDate": "2026-05-12T04:04:55Z",
                "toVersion": "9.1.0.0.25318225",
                "fromVersion": "1.1.1-12345",
                "imageType": "PATCH",
                "id": "d6b64a7b-ef15-48e6-a2a7-090ec11955eb",
                "type": "NSX_T_MANAGER"
            }
        ]
    }
}
Now although there isn’t a DELETE method for these upgrade objects, you can update them and mark them for deletion. The PATCH request to /v1/upgrades/{upgradeId} does just that. Simply combine the upgrade id from the result with the following body:
{
    "markForCancellation": true
}
And execute the request.
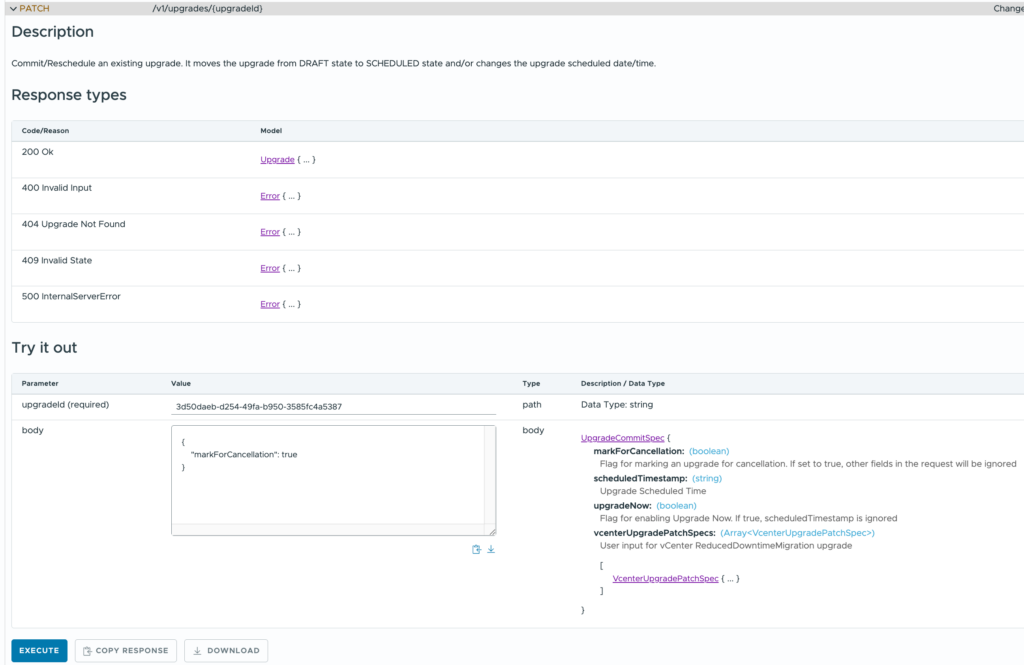
Boom! The “CONFIGURE” button for the vCenter upgrade switched to enabled and I could proceed with the rest of the Management domain updates without issue.
Follow-on Tasks
With the software versions all uplifted to 9.1.0.0, there are a few follow-on tasks to complete.
- Upgrade the dvSwitch version to 9.1.0
- Replace the default VMCA certificates with signed certificates for the new components
- Check that configuration backups are properly configured
- Upgrade VMtools versions (mostly for the AD servers)
- Upgrade VM hardware versions (mostly for the AD servers)
And, of course, I have a workload domain to upgrade too!
Photo by Markus Winkler

Related Posts